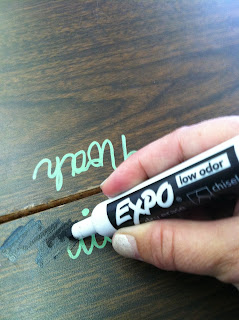
The most frequently asked question when visitors come to my room is "What did you use to write the names on your desks?"
Well, my friends, I can't stand name plates. Nope, don't like them at all! The kids pick at them, tear them, write on them, and they basically look a mess!
So, my teacher buddy (Kathy at Kathy's Coordinated Class) and I came up with the PeRfEcT solution...
Sharpie Paint Pens!
These pens rock!!
They are like your typical Paint Pen (shake and shake and shake, press and press and press and finally paint starts flowing).
The best part is - they don't wipe off! Yep, that's right! They stay put, no mess, no fuss.
So...
my second most asked question is "How does it come off?"
Let me tell you my friend it is simple!
Just rub well with an Expo marker, wipe clean with a Kleenex, and voila! It is gone!
If you are still seeing some of the Sharpie or the Expo marker, add a dab of hand sanitizer to the tissue and wipe a second time.
I have a video on this technique on my Facebook page. Be sure to follow me - see the link below!
(Btw, this little trick works with any smooth slick surface that is written on with Sharpie. For example, my laminated birthday posters have names and dates written with black Sharpie. At the end of the year, I clean with my Expo marker and the poster is ready to go for the next school year. Cool, huh?!)
The markers come in a variety of colors. Click on an image below to purchase these markers:
So, go - hurry - pick some up now and start your next school day with a clean, neat desk top!
Also, check me out on Facebook for live videos, photos, tips, and tricks!
https://www.facebook.com/Timeouts-and-Tootsie-Rolls-1814959888762750/
Update:
So many readers have commented with additional suggestions on removing permanent marker from surfaces. Old expo (dry erase) markers are my favorite, but there are many other options. I suggest testing a small area first before committing to your entire room. While I have yet to run into a problem, I have heard from some readers that they have not been as successful. Insert sad, crying emoji.
Sunday, November 18, 2012
Saturday, November 3, 2012
Essential Standards Checklist
I am Baaaccckkk!! I can't believe it's been so long since my last post! I have been busy, busy, busy!
Let's start back at the beginning...my classroom! Here are some pictures of my room this year.
It has been a great layout and I enjoy the pleasant atmosphere my room creates (considering I spend more time in my classroom than anywhere else).
Now down to business...
I have created two new items that can be found in my TpT store.
The first is a checklist for the North Carolina Essential Standards for Science and Social Studies (3rd Grade).
Click here if you would like this checklist.
I also made a skeleton cut and paste for the NC Essential Standard 3.L.1.1. In this sort, students decide which bones are needed for movement, protection, and support.
If you would like this activity, visit my TpT store.
Now that I am back at it - I can't wait to share all the things my class has been up to.
Stay tuned...
Subscribe to:
Comments (Atom)


